Well what can I say??? Character modeling sure takes a lot out of you! And it is completely different to just modeling props. That was partly why i decided to try character modeling as i thought to myself, it shouldn't be much harder, but i was wrong!
I have learned a hell of a lot since the beginning of this term and must thank Dan for coming up with this unit!
What have i learned you say? Well to begin with, i need to make sure that i have a high quality image in which i can use to help me model, the front and side profile need to match up perfectly so that i can a line everything correctly, as well as each side of the face is mirrored up right.
Once modeling i found out that using a plane to start off with, was the best way to go instead of using a sphere and try to remould it. I now know a limit to sub divisional lines, which is around five horizontal and five landscape. It is always better to have less lines and to add them in than to have to many lines which can make things a lot harder to begin with.
I now know a lot more about extruding, and how important that tool is, i had used it before, but not to the degree that i have now.
Even the little things seem to count more to me now like reference images! They have been very handy when it came to things like hands, feet and facial parts, for example nose and ears. You need a good understanding of visuals to understand how to model! Again i come back to life drawing, taking in everything you see, hand to eye coordination.
Extracting was a new tool i learned and how to use it properly which became really important when modeling the hair. I had no idea why i was having them problems before until researching. I had never used video tutorials so much in one of my projects before, until now. I really must say they are the best thing you can have when learning new things.
To some this may sound like things i should have known from the start, but how could i until actually doing this for yourself! You soon realise the importance of things once you are on the road.
Even though my model is not complete, i am really happy with what i have learned, all problems matter whether big or small!
Monday 10 January 2011
Sunday 9 January 2011
Hair
When the thinking process started to begin for the hair, i had to figure out a few things. I thought about trying to make real strands of hair, but with a little research looked very time consuming, difficult and would make the data file rather large which would slow down rendering time. As i wanted my character to be stylized, i started looking into other methods and found such a great tutorial which was so interesting to watch, not just because of the technique but his character was so interesting. It was also something that i had learned since this unit, which was using extrude.
The video which helped me do this part was: http://lesterbanks.com/2010/05/maya-stylized-character-modeling-tutorial-creating-hair/
 To start with i went round the base of the head by selecting the faces so that i could figure out the hair lining, i done a rough set up as a guide and extruded that to start showing signs of hair.
 Here is what it started to look like, as you can see it looks a little like a bowl hair cut. If i were doing a boy, then modeling the hair would have been a lot easier.
 Once i started to play around with the vertex, i noticed how i needed to start pulling the vertex out instead of just down to start shaping a fringe. But once i started to try and pull them out, the face started to deform and mess up the geometry, i was unclear on why this was happening, i tried a few things but nothing was working, so i went back to researching and found out the problem. The issue was that i needed to go onto mesh and use extract which separated the hair from the head, so i now had two objects. I never knew i could do that and would not have found this out if i had not researched. From then i was able to shape the fringe again with no problems.
Now that the fringe has started to take shape i could see how my character was coming along. I still have a lot of reshaping to do and making it smoother but i can confidently say that i can do this. Without video tutorials, there is no way i would have been able to get half as far as i have.
The video which helped me do this part was: http://lesterbanks.com/2010/05/maya-stylized-character-modeling-tutorial-creating-hair/
 To start with i went round the base of the head by selecting the faces so that i could figure out the hair lining, i done a rough set up as a guide and extruded that to start showing signs of hair.
 Here is what it started to look like, as you can see it looks a little like a bowl hair cut. If i were doing a boy, then modeling the hair would have been a lot easier.
 Once i started to play around with the vertex, i noticed how i needed to start pulling the vertex out instead of just down to start shaping a fringe. But once i started to try and pull them out, the face started to deform and mess up the geometry, i was unclear on why this was happening, i tried a few things but nothing was working, so i went back to researching and found out the problem. The issue was that i needed to go onto mesh and use extract which separated the hair from the head, so i now had two objects. I never knew i could do that and would not have found this out if i had not researched. From then i was able to shape the fringe again with no problems.

Now that the fringe has started to take shape i could see how my character was coming along. I still have a lot of reshaping to do and making it smoother but i can confidently say that i can do this. Without video tutorials, there is no way i would have been able to get half as far as i have.
Face modeling
Onto the next stage of modeling, the face, i sure had an interesting adventure whilst creating this. Modeling the face takes just as long, if not longer than making the rest of the body. Whilst embarking on this, i found many little problems which i have had to change in order to get the face spaced out. When modeling i realised that my template once again was not right, i had made sure that the side profile was a line to the front, but one side of the face was slightly different to the other.
The best method i found when modeling was by using a plane, but to only over half the face, unlike the usual type of way of modeling i was inserting ledge loop to make rough guide lines for the eyes, top of nose, lower nose and the mouth. Lots of extruding was used. My face looked very blocky for quite some time, but taking time to remove vertex was what i needed to do to perfect my face the best i could.
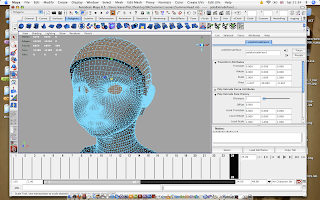
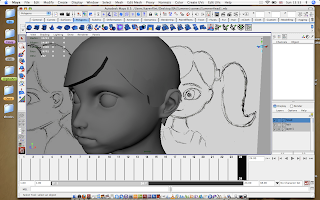
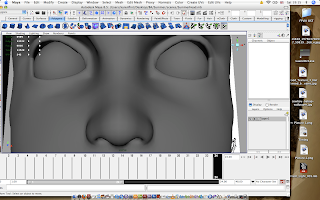
Due to a problem i had with my mac book a few days ago, i lost all my screen shot pictures to show the progress of my modeling, and was silly enough not to back them up. I never thought of backing them up before, just the actual data file. So i sadly do not have as many pictures to show as what i was hoping. But below are screen shots nearer the end of my face modeling, there is still work to be done, as my character is looking a little too realistic which i do not want. In order to achieve this i need to play about with vertex and maybe delete some detail i have done. This shall be done within a few weeks which i shall post up, as i do not want to stop after the deadline as these are all things that i am learning and documenting for the future.
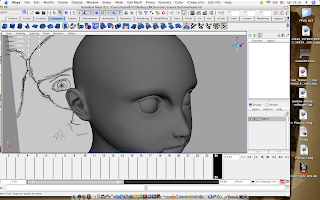
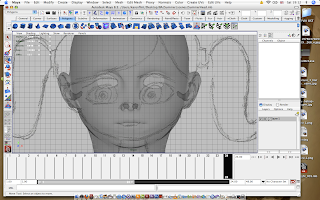 The main thing when modeling was how the eyes were far to low which made her look a little like an alien, which was def not the style i was looking for, so i had to select a lot of the vertex to raise the eyes up, i had to play around a little to see where the eyes were suited most and think about the alinements of the nose. Everything else is pretty much to the template which i am pleased about. I still have things to learn when it comes to making sure i have everything perfectly to scale with an image so that i can model easier.
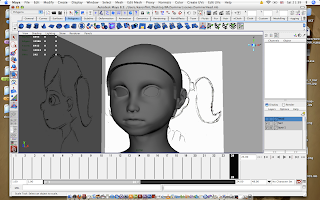
 For the time being the head is a little larger than the image template, this is partly just for myself to work out how high up to have her hair lining should be. As she is a little girl, they normally either have really thick hair, or very thin hair. I am unclear on which i should go for, but once i start modeling the hair, then i shall be able to work this out. Trying to imagine things without actually seeing it with your own eyes can be quite hard, which is why being able to change things once they have been modeled is so great.
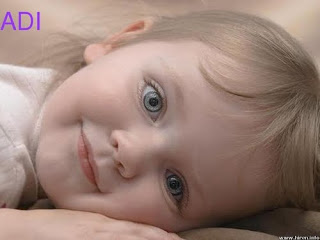
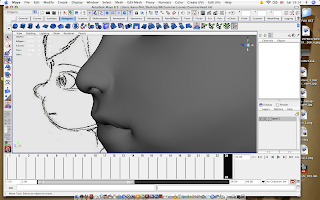 Once i had modeled the nose, i started to realise that she was looking a little too realistic. The main way this happened was because i thought the bridge of the nose in my image went in to far which i did not really like, but i wanted to make sure that the character had a button nose. I started to look at reference images of children's nose and i think i got a little to carried away with using that image to create my nose. Below is the image i was using to help model my nose.
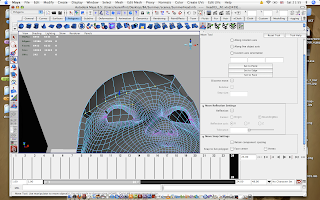
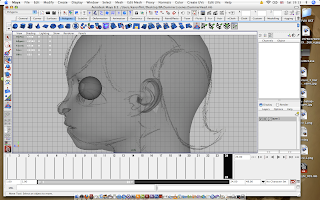
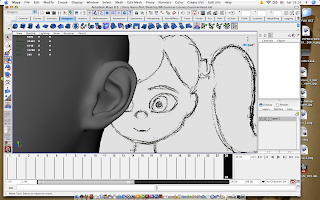 When it came to the ears, i was a little unsure on how to model it. I was confused because i didn't know anything better than our own ears. I thought to myself i could just have one main indent to show the basic idea of an ear, but then i thought to myself how strange that would appear after i made the nose realistic.
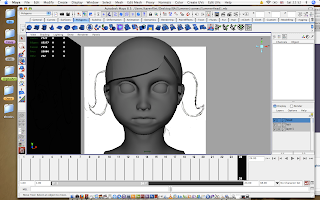
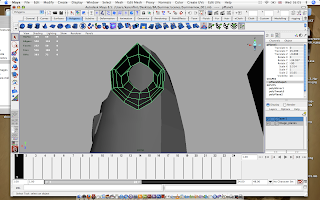
 The eyes were one of the easier things to make which i was surprised about as i was worried about making eye lids, but it all came down to playing around with extrude and deleting faces. I've made the eyes fairly big, mainly to symbolize puppy eyes which always make people and animals look cuter, which is very much something i want to try and show.
 The eye shape are not the normal shape in which we all have. In the image template, i draw a straight line for the inner part of the eye socket, but when modeling i realised that showing this on the outside made her eyes look even bigger without actually having to do so.
The best method i found when modeling was by using a plane, but to only over half the face, unlike the usual type of way of modeling i was inserting ledge loop to make rough guide lines for the eyes, top of nose, lower nose and the mouth. Lots of extruding was used. My face looked very blocky for quite some time, but taking time to remove vertex was what i needed to do to perfect my face the best i could.
Due to a problem i had with my mac book a few days ago, i lost all my screen shot pictures to show the progress of my modeling, and was silly enough not to back them up. I never thought of backing them up before, just the actual data file. So i sadly do not have as many pictures to show as what i was hoping. But below are screen shots nearer the end of my face modeling, there is still work to be done, as my character is looking a little too realistic which i do not want. In order to achieve this i need to play about with vertex and maybe delete some detail i have done. This shall be done within a few weeks which i shall post up, as i do not want to stop after the deadline as these are all things that i am learning and documenting for the future.
 The main thing when modeling was how the eyes were far to low which made her look a little like an alien, which was def not the style i was looking for, so i had to select a lot of the vertex to raise the eyes up, i had to play around a little to see where the eyes were suited most and think about the alinements of the nose. Everything else is pretty much to the template which i am pleased about. I still have things to learn when it comes to making sure i have everything perfectly to scale with an image so that i can model easier.
 For the time being the head is a little larger than the image template, this is partly just for myself to work out how high up to have her hair lining should be. As she is a little girl, they normally either have really thick hair, or very thin hair. I am unclear on which i should go for, but once i start modeling the hair, then i shall be able to work this out. Trying to imagine things without actually seeing it with your own eyes can be quite hard, which is why being able to change things once they have been modeled is so great.
 Once i had modeled the nose, i started to realise that she was looking a little too realistic. The main way this happened was because i thought the bridge of the nose in my image went in to far which i did not really like, but i wanted to make sure that the character had a button nose. I started to look at reference images of children's nose and i think i got a little to carried away with using that image to create my nose. Below is the image i was using to help model my nose.
 When it came to the ears, i was a little unsure on how to model it. I was confused because i didn't know anything better than our own ears. I thought to myself i could just have one main indent to show the basic idea of an ear, but then i thought to myself how strange that would appear after i made the nose realistic.
 The eyes were one of the easier things to make which i was surprised about as i was worried about making eye lids, but it all came down to playing around with extrude and deleting faces. I've made the eyes fairly big, mainly to symbolize puppy eyes which always make people and animals look cuter, which is very much something i want to try and show.
 The eye shape are not the normal shape in which we all have. In the image template, i draw a straight line for the inner part of the eye socket, but when modeling i realised that showing this on the outside made her eyes look even bigger without actually having to do so.
Friday 7 January 2011
Concerns
Well i am onto the stage of modeling the face now but i have some concerns, i thought this may be quite simple, but at the moment i think i am wrong. The main worries i am having at the moment is about the mouth, how do i model the inside of the mouth? Can i just extrude the shape of the mouth inwards? But then i thought to myself, well how can the mouth then open and close properly? And my other concern is for the eyes, how do i make the eye lids, so that my character can blink? At the moment i just have the rough shape of the head, which i think i now have to get rid of or at least put to the side for now.
I think the best thing to do is to redraw my characters head and put in extra lines such as the line for the bridge of the nose. Making my drawing look a little more 3D shall help me to model, and thinking back to life drawing should be a great help for this. If i can not sort this out then i may have to consider changing some of her features, one of the things i am thinking of changing is her hair due to how stylized it is.
I done some research into face modeling i have a book called 'Stop Staring' by Jason Osipa which is really useful. It goes really into depth on how to face modeling, and other interesting things that i had learned in the first year about how the mouth looks to particular words. For example if you use 'B,M or P' the mouth will be closed, but if you use 'O' then the mouth will become narrow. It is all about the pronounciation of words.
I also looked into video tutorials and have found one which i think will be quite useful, this again came from youtube. I am quite surprised in how useful youtube seems to be when it comes to animation.
The link for this is : http://www.youtube.com/user/OmniCausticInfidel#p/u/0/PXjMpTRk93M
The head
 I done a very quick test on my characters head to see how this method would work. It was the easiest thing you can pretty much do. Get a sphere and just move some of the vertex to shape the cheeks and chin.
  This was mainly done for show, so that i could see how things were coming together. From here i can start to model the face. I have a few worries at this time, and may have to do back to the drawing board with the characters face.
 Again this was just a quick test to see how everything was coming together. This is not really the right in going about modeling a neck. Once i start facial modeling, i shall modeling the neck with her head so that they are molded together.
 Here is how my character looks with the few parts added. I shall be remaking this properly, but again this is a learning stage of how not to make a character.
Thursday 6 January 2011
Peg leg
When starting to model the legs, i thought this was going to be pretty interesting, as a child's leg is much smaller and chunkier than an adults. I did not really have much reference. So i needed to go and visit my younger niece who is six years old. Even though she is older than what my character is going to be, it was definitely going to be a big help, and it was. I now had a better idea on how to model a leg. Even though i have my image plane, at this stage i was not taking too much notice as i knew that it was not to the standard i needed.
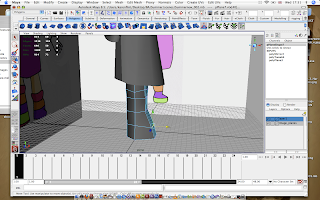
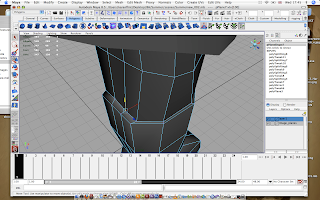
 Here i have roughly modeled half a leg. It is not to a high standard as of yet, but i was wondering, so i model the foot separately or all in one. I thought separately as that was how i modeled my arms and hands, so i thought the same method could apply to this too.
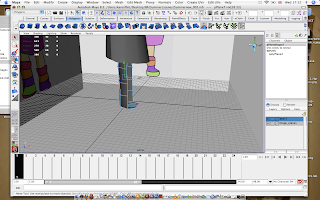
 I tried experimenting modeling the two separately, but quickly realised that this was not going to be the way because she is wearing long socks. I remade the leg and made it so that i could use the bottom vertex to pull across to make a foot. The first time i tried making the leg i deleted the bottom face, so there was no base for me to work on.
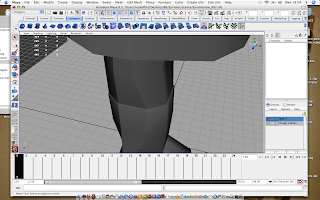
 You can now see the foot coming into shape, but now i had other questions in my mind. How big does her feet need to be? I had to make sure that her feet would be big enough to support her weight but not look like she had adult feet. Dan made me realise that her feet needed to be bigger due to the rig, there has to be enough space so that the rig will be big enough for her feet to work properly.
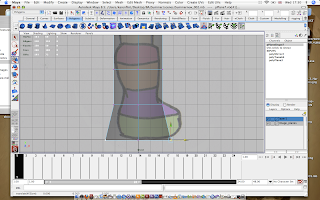
 As my character is wearing socks, i needed to show this, but i did not want that to show this through a texture as i wanted this to be shown through the geometry. So i thought the best way to do this would be by extruded the faces around half way up her leg so that you can physically see a sock. Once i had done this the sock looked far too thick, so i had to thin this out around the top of the sock.
 Here i have roughly modeled half a leg. It is not to a high standard as of yet, but i was wondering, so i model the foot separately or all in one. I thought separately as that was how i modeled my arms and hands, so i thought the same method could apply to this too.
  I tried experimenting modeling the two separately, but quickly realised that this was not going to be the way because she is wearing long socks. I remade the leg and made it so that i could use the bottom vertex to pull across to make a foot. The first time i tried making the leg i deleted the bottom face, so there was no base for me to work on.
 You can now see the foot coming into shape, but now i had other questions in my mind. How big does her feet need to be? I had to make sure that her feet would be big enough to support her weight but not look like she had adult feet. Dan made me realise that her feet needed to be bigger due to the rig, there has to be enough space so that the rig will be big enough for her feet to work properly.
  As my character is wearing socks, i needed to show this, but i did not want that to show this through a texture as i wanted this to be shown through the geometry. So i thought the best way to do this would be by extruded the faces around half way up her leg so that you can physically see a sock. Once i had done this the sock looked far too thick, so i had to thin this out around the top of the sock.
A image of how the sock now looks. Now my character will look that little more realistic with added features like this.
Arms
When modeling the arms i used the same method by using a plane which was working well. The only thing that i started to notice was that the arm did not seem in proportion with the body. the arm looked too small. Again this was another fault with my image plane and was making me realise how much work she still needed. Even though the image is to a good standard, it is not the right type of image to use for modeling. I had to move the arm to a 90 degree angle so that it was straight next to the body, once i had done this i knew for sure that her arm was too short. This was easily resolved by scaling the arm to make it longer.
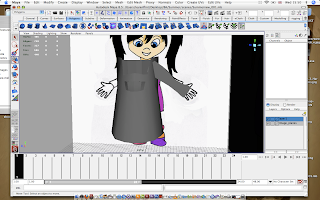 Here is an image when i first started modeling out the arm. This is just a flat plane, which is to scale with the image plan.
 You can now see how much longer i have made her arm. The only thing that comes to mind now, is that i have not modeled the hands yet, so this could mean that the arms may be to long once i have completed the whole arm. Once i have modeled the hands then i shall be able to tell for sure if the arm length is correct.
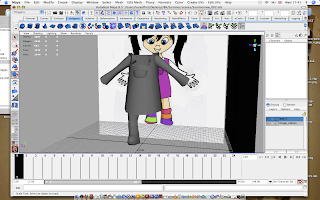
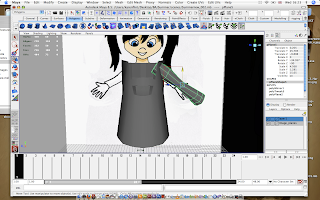
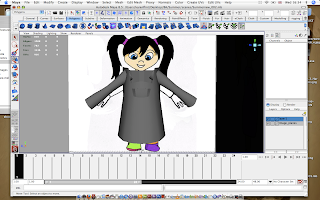 This is just an image for you to see how the figure is coming along now that she has both arms, which was done by using the mirror geometry.
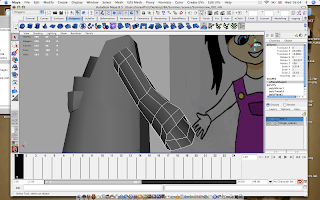 The images above show the ends of the arms and how they are not very circular, this is due to the lack of sub divisional lines. I tried not to have to many as i do not may the ploy count to be too large, but i am starting to think that when it comes to the characters, you need quite a few to get to the standard you need. At first i was thinking that maybe the smooth tool could help me, but i could still see lines in the arms when i had tested this. The way to solve this is by adding more sub divisional lines and rotate them around the arm for it to become smoother.
 Here is an image when i first started modeling out the arm. This is just a flat plane, which is to scale with the image plan.
 You can now see how much longer i have made her arm. The only thing that comes to mind now, is that i have not modeled the hands yet, so this could mean that the arms may be to long once i have completed the whole arm. Once i have modeled the hands then i shall be able to tell for sure if the arm length is correct.
 This is just an image for you to see how the figure is coming along now that she has both arms, which was done by using the mirror geometry.
 The images above show the ends of the arms and how they are not very circular, this is due to the lack of sub divisional lines. I tried not to have to many as i do not may the ploy count to be too large, but i am starting to think that when it comes to the characters, you need quite a few to get to the standard you need. At first i was thinking that maybe the smooth tool could help me, but i could still see lines in the arms when i had tested this. The way to solve this is by adding more sub divisional lines and rotate them around the arm for it to become smoother.
Subscribe to:
Posts (Atom)