Okay so i have done some research and have found a new method to try and do for the modeling. This consists of using a plane to start the shape, move all the vertex from the front profile and then wrap it round the object. This to me sounds harder than what i was previously trying to do, but this is what this course is all about trying new things to get the best method which will suit each individual. Once i would have done that i need to pull some of the vertex back, which will then give me the sides.
Part of me is thinking would it be best to model half the object and then mirror this or if i should try and wrap the plane without having to mirror. If i was to use the mirror then i know that everything would be consistent which is something that will be very important to this project. I have to make sure that everything to the left is the same as the right. Even a few different vertex could ruin the model when it comes to animating as the audience may be able to tell that the model is not quite to the standard that is needs to be.
Youtube has been a great help to this, i found a guy who uses a plane to model and i am now going to try and follow in his foot steps to see how this goes.
The link to this is : http://www.youtube.com/user/da1bu89#p/c/42044C295112B3D6/9/_mKhwPeYMfs.
Thursday, 16 December 2010
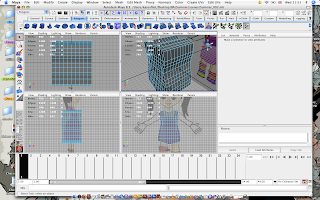
 Here i have started to try and make the arm of my model, again, i never really know how many sub divisional lines i should have, its a lot easier to add lines in than to take them out, but having more lines will mean that the object will be a lot smoother as i am trying to get a circular shape to the arm.
 Another thing with modeling is that you need to keep moving the lines or they will all start to get infused in one another and the shape then starts to unravel. Then when it would come to texturing then it wouldn't work properly.


 With a few of the earlier pictures you can see that the shape is quite blocky. Karl told me about a smooth tool which will help to make everything become a lot smoother which will then make the object more realistic. I tried this and as you can see the shape is now beginning to take form, but this is still not to the standard that i want.
Using a polygon shape to begin with and then shape has not really worked for me. I don't like how is the shape is taking form. I feel like i have less control than what i may have in other experiments. As the object is already as a whole, its hard to move all the vertex points to where you need them, as i have done quite a few mistakes with this.
I think the best thing to do now is to try another way, but i need to do some research in what other methods i can use to do this as i do not really have much knowledge on how to model in other ways.
Thursday, 18 November 2010
Useful resources
When packing, i went through some of my art books to see if there might be anything interesting which i could use for this unit, i didn't find all that much. But if you look below then i can tell you about them in more detail.
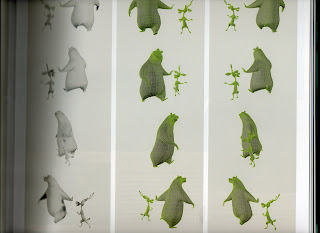
This is a page i scanned in from the art of Open Season. Here you can see all the sub divisional polygons. They are all so neat and tidy. This is the type of sub divisional need i need to keep to. If i have to many, then i will make the poly count to big which will then start to effect all the rendering. Even though we are no where near that stage i need to start thinking ahead so that we try not to give ourselves problems nearer the end of term 3.
 For those of you who have watched Disney Pixars Up, you will know the scene that i will be talking about, and for those who don't will get an understanding of the type of thing i am looking to bring in the animation.
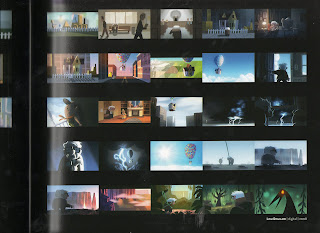
If you look at the third and forth row of the story board, you will come across a scene in the film where there is a thunder storm. I scanned this in because the colour and lighting could be really useful for our short. We need to capture some good lighting on the girl from the thunder storm, but we also don't want to show much detail to Pandy. So i need to figure out some ways in which this could be done. I'm glad i found this as this now starts me to think even further into our work, and i am sure without a doubt that there will be some sort of problems.
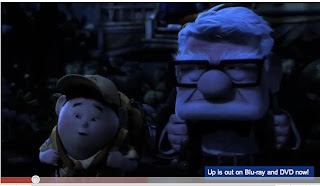
This has now moved me onto the film, below is a screen shot from the film. As you can see everything is very blue, the characters show blue in them. Now does that mean that we should try and have a natural light in the tree house to be like this or darker to try and get the audience a little more on edge??
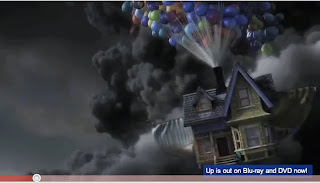
 Below is another screen shot of the storm they get caught up in, even though this scene does not show for long, the colours used in the background for the sky are very dark and depressing with the different tones of gray. This makes me realize that i do not want to show this type of emotion through our short. Even though it is through a storm, i still want the animation to come across as funny and colourful.

This is a page i scanned in from the art of Open Season. Here you can see all the sub divisional polygons. They are all so neat and tidy. This is the type of sub divisional need i need to keep to. If i have to many, then i will make the poly count to big which will then start to effect all the rendering. Even though we are no where near that stage i need to start thinking ahead so that we try not to give ourselves problems nearer the end of term 3.
 For those of you who have watched Disney Pixars Up, you will know the scene that i will be talking about, and for those who don't will get an understanding of the type of thing i am looking to bring in the animation.
If you look at the third and forth row of the story board, you will come across a scene in the film where there is a thunder storm. I scanned this in because the colour and lighting could be really useful for our short. We need to capture some good lighting on the girl from the thunder storm, but we also don't want to show much detail to Pandy. So i need to figure out some ways in which this could be done. I'm glad i found this as this now starts me to think even further into our work, and i am sure without a doubt that there will be some sort of problems.
This has now moved me onto the film, below is a screen shot from the film. As you can see everything is very blue, the characters show blue in them. Now does that mean that we should try and have a natural light in the tree house to be like this or darker to try and get the audience a little more on edge??
 Below is another screen shot of the storm they get caught up in, even though this scene does not show for long, the colours used in the background for the sky are very dark and depressing with the different tones of gray. This makes me realize that i do not want to show this type of emotion through our short. Even though it is through a storm, i still want the animation to come across as funny and colourful.
Development
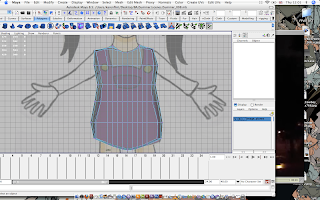
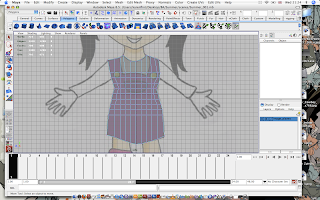
With the side profile of the little girl redo, i have now been able to re-start and be able to continue on with the body unlike before. This time round i placed a lot less sub divisional polygons, which has had made the body a lot cleaner and tidier.
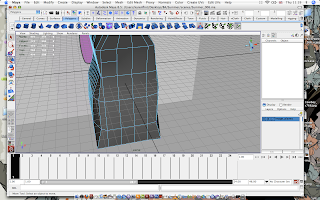
 As you can see the side profile is looking a little too flat and i need to start pushing out the sides to give the body more curve.
 Here i am just playing about with the polygons, experimenting on how far to push them out.
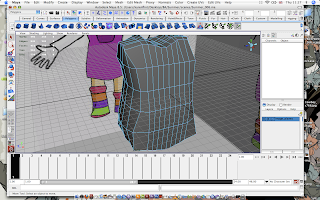 From this angle you can now see that i have curved her side, which now is starting to create my character, instead of her looking flat. I am currently working out just how far i should push in order to show shape to the body. As she is a young girl, i do not want to create too many curves, or she will portray older than what she really is, but i need to make sure she has some indication of shape as she will look like a block another wise.
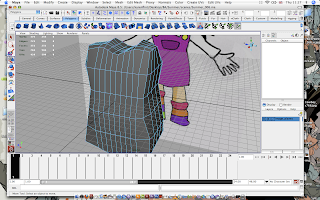 Here, i have pushed out the belly and pulled in the chest, as young children normally have little pop belly's. I also pushed in the chest as there is nothing to show at this type of age.
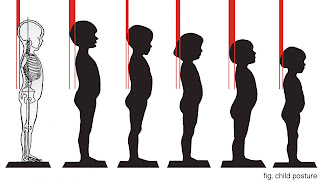
 I first started to get a little stuck when trying to shape the back, i needed to think about posture and would a child have good posture as they are always bending over, playing, jumping, etc. So i done a little bit of research and found a posture height chart of the ages of growing up. As you can see if you look to the far right, they have a the neck is inwards, then comes out for the shoulder blades then goes back in to come back out again to there bottom. I've only shown slight shape to the girls bottom, as she is wearing a dress and the dress would hang down, hiding most of her shape away.
Lastly, you can see from the front profile of how she body has now taken shape by looking at the edges. I think i now need to start thinking about modeling an arm and leg, then fitting them into place. Once this has been done, then i can see if any changes to the body need to be done.
 As you can see the side profile is looking a little too flat and i need to start pushing out the sides to give the body more curve.
 Here i am just playing about with the polygons, experimenting on how far to push them out.
 From this angle you can now see that i have curved her side, which now is starting to create my character, instead of her looking flat. I am currently working out just how far i should push in order to show shape to the body. As she is a young girl, i do not want to create too many curves, or she will portray older than what she really is, but i need to make sure she has some indication of shape as she will look like a block another wise.
 Here, i have pushed out the belly and pulled in the chest, as young children normally have little pop belly's. I also pushed in the chest as there is nothing to show at this type of age.
 I first started to get a little stuck when trying to shape the back, i needed to think about posture and would a child have good posture as they are always bending over, playing, jumping, etc. So i done a little bit of research and found a posture height chart of the ages of growing up. As you can see if you look to the far right, they have a the neck is inwards, then comes out for the shoulder blades then goes back in to come back out again to there bottom. I've only shown slight shape to the girls bottom, as she is wearing a dress and the dress would hang down, hiding most of her shape away.
Lastly, you can see from the front profile of how she body has now taken shape by looking at the edges. I think i now need to start thinking about modeling an arm and leg, then fitting them into place. Once this has been done, then i can see if any changes to the body need to be done.

Timing
If you remember in one of my earlier posts, i uploaded a thunderstorm link from you tube which is really helping me to figure out how to create a believable storm. So i evaluated the video itself. Within just over 30 seconds of the video, there were twelve bolts of lightning, five of them were really bright strikes of light, where the others seemed to be further away as they were not so bright.
As our video is going to be around thirty seconds, we want quite a few bolts of lightning to show Pandys silhouette and shadow coming closer to Summer to try and scare her. So at first i was thinking there would be a low rumbling noise to indicate a storm, this will give time for summer to look a little worried and for her torch to run out of life. After this happens our first big bolt of lighting could come which then makes summer drop her torch and cruel into the corner of the tree house. This is how i first thought the animation of the lightning could start, but i now need to figure out the timing to the rest of the thunder to make sure it fits with the rest of the animation.
From the reference video, i also tried to take notice of the colour of the sky as the lightning bolts happen, which was pretty hard to try and see. You can not actually see any real bolts of light through the video but the sky itself is really light when the bolts happen, the sky seems to be a mix between light blue and purple.
As our animation is mainly just shown through the tree house, you don't really see the sky, so if we can show a shot of the tree from the outside, then we can show a due light which then you could see the colour of the sky.
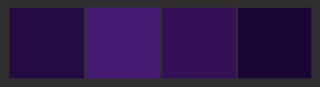

Here are a few of the colours in which i thought we could use to show the sky, but i am a little unclear if this is the right type of colours. But i need to keep in mind that as our animation is going to be stylized, then the colours we use need to match our style.
Wednesday, 17 November 2010
Character editing
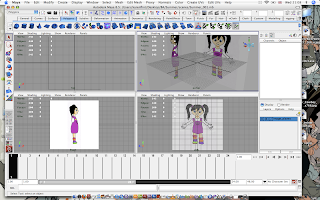
This is just a little post to show the change of the character and to show you all just how wrong i was with the scale! So make sure that you have everything lined up before you start drawing, unlike me, tut tut.
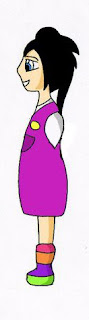 So here was my original image i first started to use to try and model with, and when you look at it, you don't think that the head looks too small, but compared to the front it is.
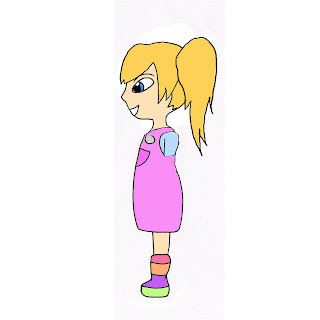 Here is where i have edited it her, as you can see, she now has a much bigger head and at first i thought it was to large. I also repositioned her nose and eye. The colours have changed to her also as i wanted softer, babier colours to show that she is a young child, as the one above makes her look slightly older than what she is.
Character modeling
When our group last spoke to Dan, we all found a role in which we could focus on for a while, Karl learning character expressions, Ryan learning UV Mapping and for me to do some character modeling. As i am the team leader is it important for me to do the first main steps so that the others can carry them through. So, with me modeling our first character, Ryan can then UV map it, followed by Karl doing rigging. If i fail to do so then we all fall apart. The only trouble i am having at the moment though is that i am in the process of moving home, and we all know how stressful and time consuming that is. But, with that said i have started the process of this, and i have found all these little problems already, which in a way is a good thing as i am already identifying them and learning how to solve them, whether big or small.
So, what is the first problem you ask? Well, when first starting on my modeling, i started to build the body as this is where you would normally start. All was going pretty well at first. Once i done the front, i went onto the side and realized that i had to many subdivisions in the polygon count. When trying to reduce this i found out that i could not as this was messing up the geometry. As i found this out i also realized that the side profile pic was not quite to scale as my front profile.
Below is a few screen shots of modeling i started until i realized the problems
 here is when i realized that i had too many subdivisions for the side profile and from them knew it is easier to add them than to try and get rid of them.
 Here is where i have spaced out the subdivisions so that it would be easier to model.
 Here is when i noticed that i should have spaced everything out instead of heading straight into modeling.
 This image is to show the set up to start modeling, but if you look closely, you can tell that the side of the head from the side compared to the front is not to the same scale.
Now i need to redraw the side profile, upload and start again and hopefully this will turn out to be a better result.
Swaps and changes
Dan has introduced a new unit for Animation which helps identify any problems we may have during the year. So basically, he is making us think about all the types of issues we might have whilst using Adobe Maya. My original plan was to focus on my main specialism which is character animation, as in our short, there is a lot of facial animation, so i really need to get inside the character to understand everything they are going through. So i wrote down a list of all the types of emotions they will be going through. For example, the little girl Summer, starts off cold and lonely in the dark, but when her torch goes out, she starts to get a little scared and once a she hears thunder, then she is completely freaked out. So with this in mind, i have wrote down the type of facial expressions she would pull. Now its down to me to draw them out so that i can capture the key moments in the animation.
Once our group had a group discussion with Dan, he made me realize that this is not really a main concern for the animation. Dan told me that i really need to think about the thunder and lightning. I need to think about the lightning as if it was its own character as i need to animate the lighting. So, now its all about me researching into thunder, to understand the time difference between the sound of thunder to the actual light of lightning. At first i was a little confused and thought this would be a really complex thing to do. But this is what this whole unit is about, and i find this to be a great use. If our group can resolve all our problems now, then hopefully we shall have a lot less stress later on in the year.
Okay, so i have researched into lightning a bit. This is mainly through watching videos from you tube, which has actually been a great help. Not only do i have a better understanding of what a thunder storm is like, it has also made me realize the right type of sound i need as well as colour. When thinking of colour, you think its all gray and gloomy which is correct, but what about when it is at night?? I don't want the animation to seem too dark or that may scare our target audience which is around 5/16 year old. So at the moment i am thinking of having the night shown through purple as this is a warmer colour to blue as that could portray more depressing.
http://www.youtube.com/watch?v=E8cMSyzFoLs
Above is a link to a really good resource video from you tube which will really help me to help capture the right timing and mood for our animation.
Subscribe to:
Posts (Atom)